Hi I'm Rob,
I'll be your guide today.
robdodson.me
@rob_dodson
robdodson
Within this talk...
Web Components?
The Specs
Use 'em, Today!
Code Ahead!
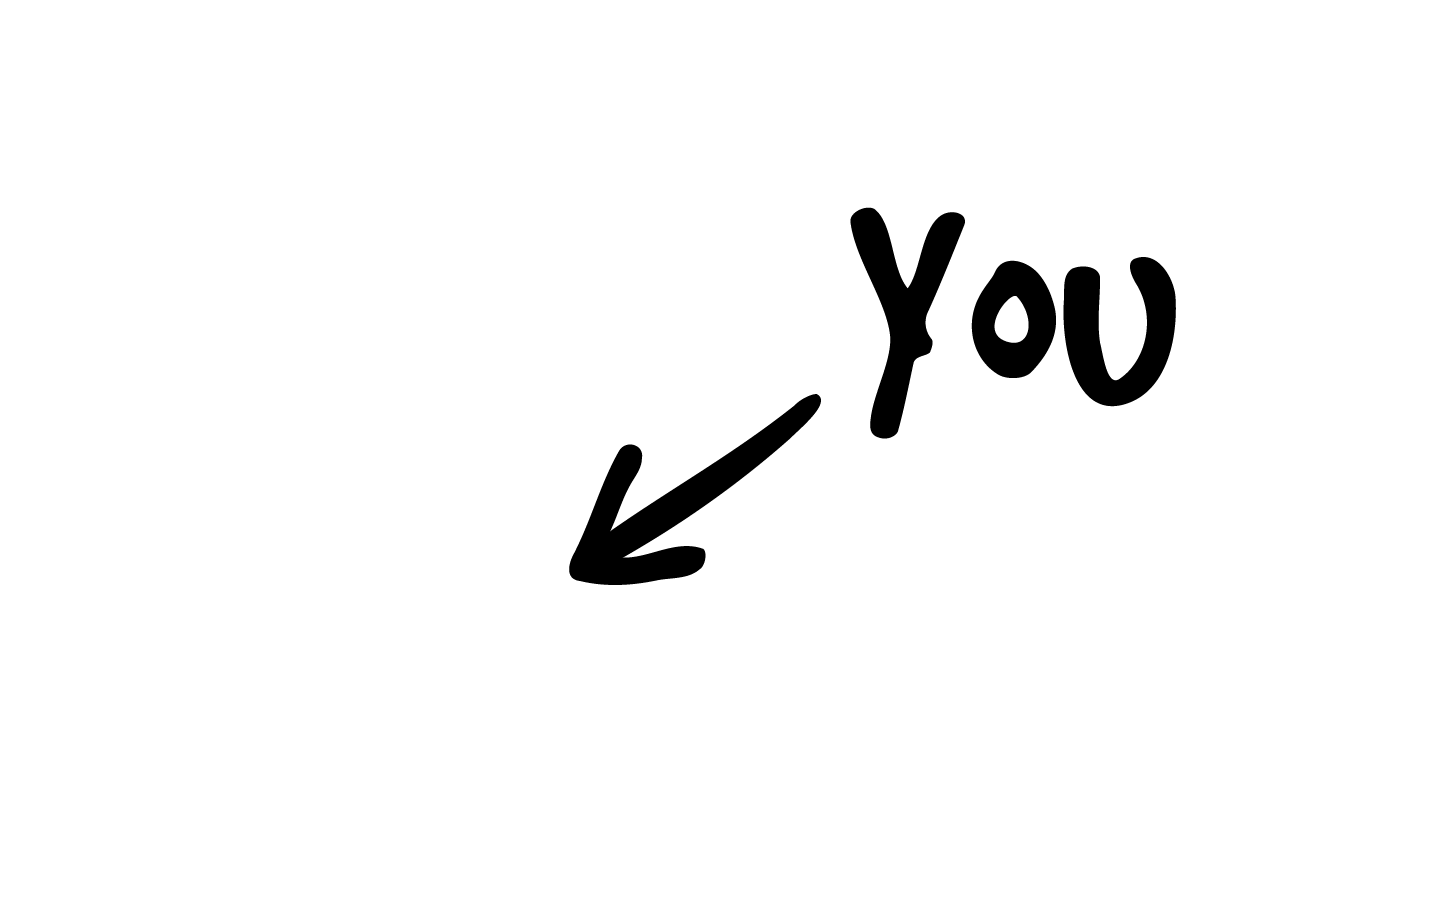
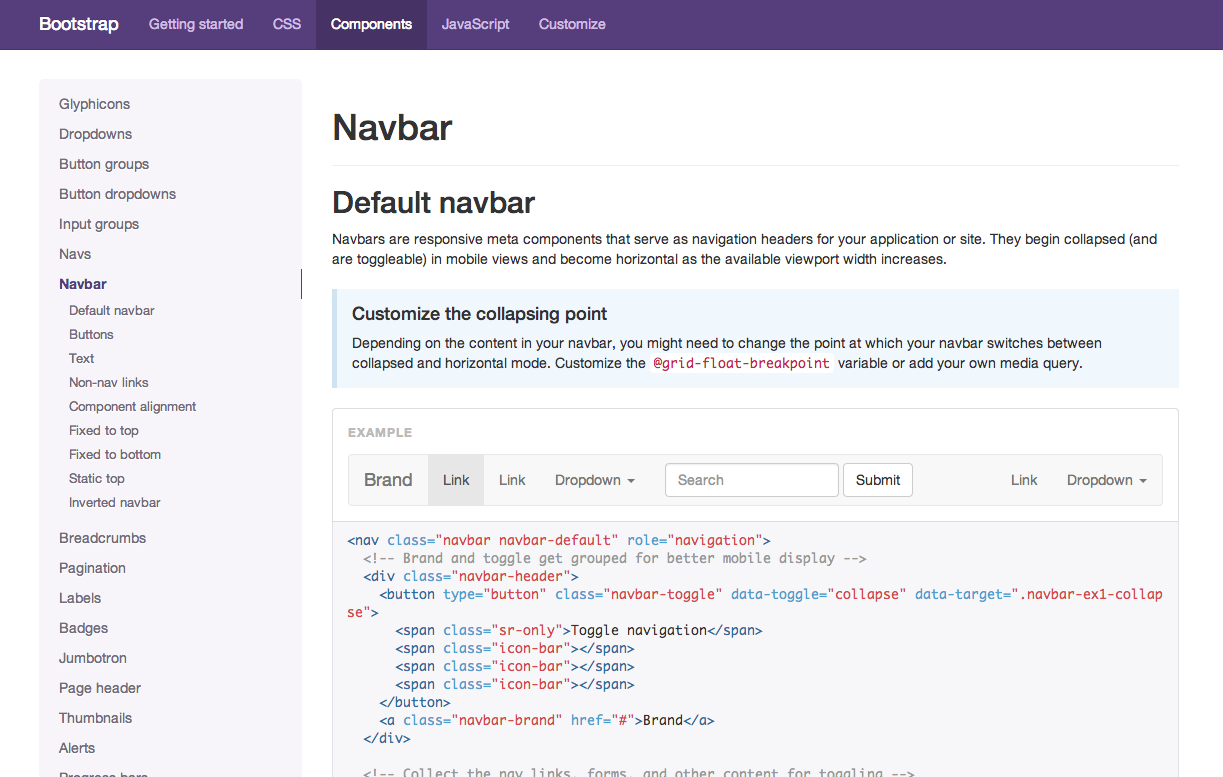
How do
you use Bootstrap?
How do
you use Foundation?
How do
you use Kendo UI?
How do
you use jQuery UI?
1. Go to Docs
2. Copy all the things

3. Receive Widget
We can do better
2. Copy all the things
  Home
  About
  Bacon
2. Use the thing
Web Components!
1. Create your own HTML Elements
2. Scope your styles
3. React with lifecycle callbacks
Web Components use the same tools that the browser makers use.
<chart-pie></chart-pie>
              <mark-down>

                ## Oh hai!

                ### How _you_ doin?

                [Link me!](foo.com)

              </mark-down>
Web
Components
Templates
Scaffolding
Shadow DOM
Encapsulation
Custom Elements
Extensions
Imports
Packaging
Templates +
Shadow DOM
Custom Elements
Imports get everything on the page
Templates
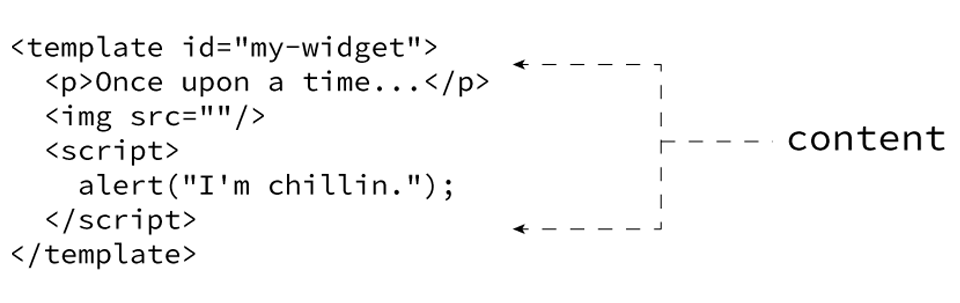
Templates are inert chunks of DOM that can be reused.
Template Basics
<template>
  <p>Once upon a time...</p>
  <img src=""/> <!-- Fill me in when you're ready -->
  <script>
    alert("I'm chillin."); // Totally inert!
  </script>
</template>
The Content Keyword
Using Templates
<template id="my-template">
  <img src=""/>
  <p>Templates. Full of WIN!</p>
  <script> alert("I'm alive!") </script>
</template>

<script>
  var tmpl = document.querySelector("#my-template");
  tmpl.content.querySelector("img").src = "corgi.gif";
  document.body.appendChild(document.importNode(tmpl.content, true));
</script>
Templates. Full of WIN!
Gotchas
No Built-In Data Interpolation
{{ }} tags don't do anything...yet
Nested Templates Are Not Automatically Activated
You'll have to append each separately
Browser Support
Chrome / Mobile Chrome
Firefox
Internet Explorer
Safari / Mobile Safari
Opera / Opera Mini
Templates
Scaffolding
Shadow DOM
Encapsulation
Custom Elements
Extensions
Imports
Packaging
Shadow DOM
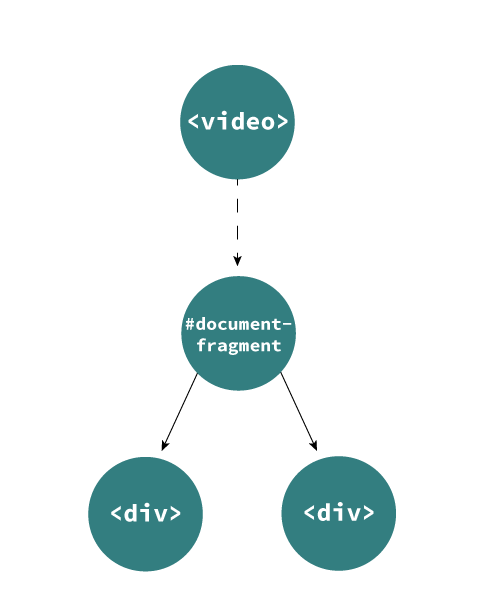
The Shadow DOM provides style and markup encapsulation.
It is the same technology used by browser makers to implement tags like <video> and <textarea>.
<video>'s secret DOM
<video src="./bunny.webm" controls></video>
Shadow Host
The node that contains all of our shadow DOM
Shadow Root
The first node in the shadow DOM
Shadow Boundary
The barrier that protects our shadow DOM


element.createShadowRoot()
Our first shadow dom
<div class="widget">Hello, world!</div>
<script>
  var host = document.querySelector(".widget");
  var root = host.createShadowRoot();
  root.innerHTML = "<em>I'm inside yr div!</em>";
</script>
Only descendants of the Shadow Root will be rendered.
Style Encapsulation
<template>
  <style>
    h3 { color: white; background: tomato; }
  </style>
  <h3>A Shadow H3 Header</h3>
</template>
<script>
  var tmpl = document.querySelector("template");
  var host = document.querySelector(".widget");
  var root = host.createShadowRoot();
  root.appendChild(document.importNode(tmpl.content, true));
</script>
A Shadow H3 Header
An H3 Header
You can poke holes in the
shadow boundary with the
::shadow pseudo-element.
Styling
<template>
  <h3 class="heading">Interesting Article</h3>
  <p class="article">Article copy is special!</p>
</template>
<style>
  .widget::shadow .heading { font-family: Courier; }
  .widget::shadow .article { font-style: italic; }
</style>
Interesting Article
Article copy is special!
Styling :host
<template>
  <style>
    :host {
      border: 5px solid red;
    }
  </style>
  <h2>Oh hai!</h2>
</template>
Oh hai!
Theming
<template>
  <style>
    :host-context(.skinny) h2 {
      font-family: 'Open Sans Condensed';
      letter-spacing: -0.09em;
    }
  </style>
  <h2>Oh hai!</h2>
</template>
All jammed up
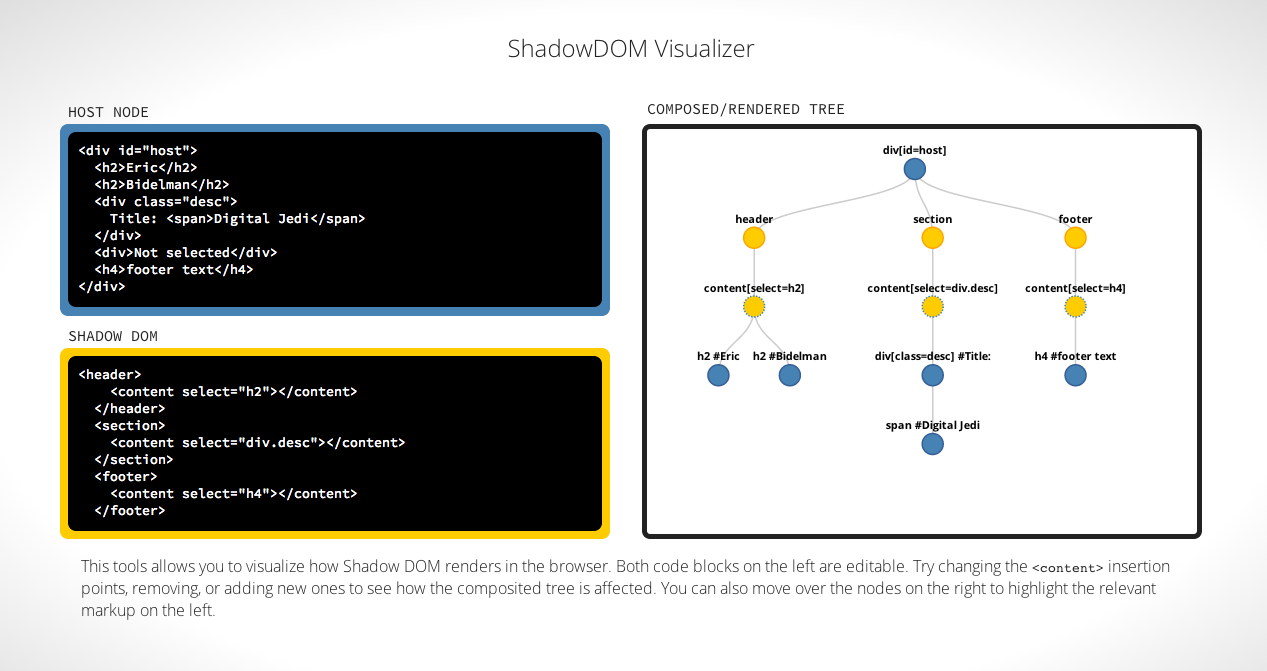
Insertion points invite content from the host element into the Shadow DOM.
Use the <content> tag to create an insertion point.
Insertion Points
<template>
  <h2>A Wild <content></content> Appeared!</h2>
</template>
<div class="widget">
  Jigglypuff
</div>
A Wild

Specific content can be targeted with the select attribute.
Select
<h3>Last Name: <content select=".last-name"></content></h3>
<h3>First Name: <content select=".first-name"></content></h3>
<h3><content select=""></content></h3>
<div class="widget">
  Hello World
  <span class="first-name">Rob</span>
  <span class="last-name">Dodson</span>
</div>
Last Name:
First Name:
What About JavaScript?
There is no special encapsulation but events are retargeted to the Shadow Host.
Browser Support
Chrome / Mobile Chrome
Firefox (In Development)
Internet Explorer
Safari / Mobile Safari
Opera / Opera Mini
Templates
Scaffolding
Shadow DOM
Encapsulation
Custom Elements
Extensions
Imports
Packaging
Custom Elements
Custom Elements are new tags that extend the browser.
Templates +
Shadow DOM
Custom Elements
document.registerElement('tag-name', {

              prototype: proto

          })
Tag name must have a dash
Proto must inherit from HTMLElement
Creating a Custom Element
var tmpl = document.querySelector("#some-template");

var WidgetProto = Object.create(HTMLElement.prototype);

WidgetProto.createdCallback = function() {
  var root = this.createShadowRoot();
  root.appendChild(document.importNode(tmpl.content, true));
};

var Widget = document.registerElement("my-widget", {
  prototype: WidgetProto
});
Using Your Element
<my-widget></my-widget> // OR
document.createElement("my-widget") // OR
new Widget()
Lifecycle Callbacks
createdCallback()
When a new instance is created. Use like a constructor
attachedCallback()
When an element is added to the page
detachedCallback()
When an element is removed from the page
attributeChangedCallback(attrName, oldVal, newVal)
When one of an element's attributes changes
Type Extension Elements
var MyButton = document.registerElement("my-button", {
  extends: "button",
  prototype: Object.create(HTMLButtonElement.prototype)
});
Add your element to the page
<button is="my-button"></button>
var btn = document.createElement("button", "my-button");
var btn = new MyButton();
Goodbye <element>... for now
<element name="my-widget">
  ...
</element>
It's taking a beauty nap
MailChimp
<mc-signup
  url="http://robdodson.us7.list-manage.com/subscribe/post"
  u="5727aa0eb1ccbf4ae68284189"
  id="6719a28b56">
</mc-signup>
Dashboards
<chart-pie values="[...]"></chart-pie>
<chart-doughnut values="[...]"></chart-doughnut>
<chart-polar-area values="[...]"></chart-polar-area>
<chart-radar values="[...]"></chart-radar>
<chart-line values="[...]"></chart-line>
<chart-bar values="[...]"></chart-bar>
Google Analytics
<g-analytics
  account="UA-44428880-1"
  domain="localhost">
</g-analytics>
Moment
Oct 26, 1985
Oct 26, 1985
Browser Support
Chrome / Mobile Chrome
Firefox (In Development)
Internet Explorer
Safari / Mobile Safari
Opera / Opera Mini
Templates
Scaffolding
Shadow DOM
Encapsulation
Custom Elements
Extensions
Imports
Packaging
Imports
Imports load
external documents into your page.
<link rel="import"
      href="my-import.html">
Use a link tag, just like CSS
Use rel type import
Importing Custom Elements
<head>
  <link rel="import" href="./imports/chart.html">
</head>
<body>
  <chart-pie></chart-pie>
</body>
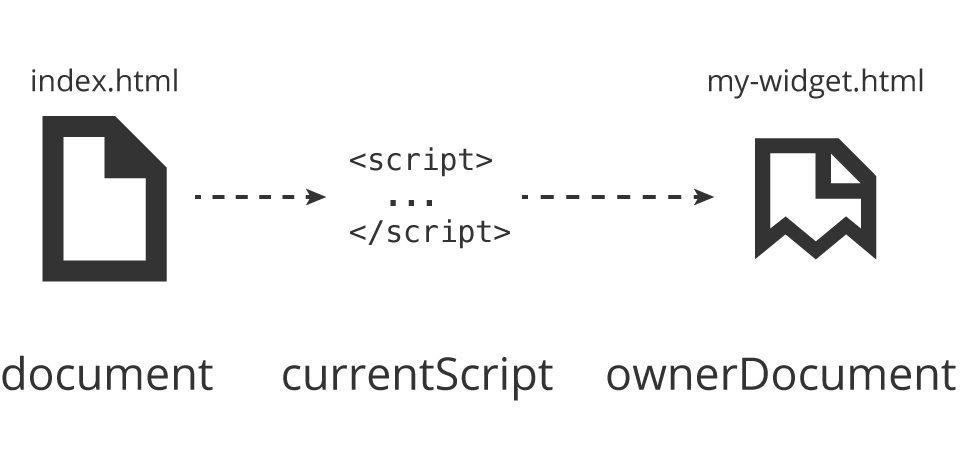
No need to check if the import is loaded
The import
<template>
  ...
</template>

<script>
  var owner = document.currentScript.ownerDocument;
  var tmpl = owner.querySelector("template");

  var WidgetProto = Object.create(HTMLElement.prototype);

  WidgetProto.createdCallback = function() {
    ...
  };

  var Widget = document.registerElement("my-widget", {
    prototype: WidgetProto
  });
</script>
Browser Support
Chrome / Mobile Chrome
Firefox (In Development)
Internet Explorer
Safari / Mobile Safari
Opera / Opera Mini
Use 'em Today!
Polymer
A collection of polyfills which let us use Web Components in all modern browsers.
Also a library for building applications with web components.
Polymer Extras
Web Animations
Gestures
Model-driven Views (MDV)
Basic Polymer Element
<script src="components/platform/platform.js"></script>
<link rel="import" href="components/polymer/polymer.html">
<polymer-element name="my-element">
  <template>
    <h2>
      Hello, I'm a Polymer element
    </h2>
  </template>
  <script>Polymer("my-element");</script>
</polymer-element>
<!-- Ready to rock! -->
<my-element></my-element>
Attributes
<polymer-element name="fav-color" attributes="color">
  <template>
    <h2>My favorite color is: {{ color }}</h2>
  </template>
  <script>
    Polymer("fav-color", {
      color: "Orange"
    });
  </script>
</polymer-element>
<fav-color color="Purple"></fav-color>
Live Bindings
<polymer-element name="color-picker" attributes="color">
  <template>
    <p>My favorite color is
      <span style="background: {{ color }}">{{ color }}</span>
    </p>
    <input type="text" value="{{ color }}">
  </template>
  <script>
    Polymer("color-picker", { color: "Tomato" });
  </script>
</polymer-element>
Lifecycle Callbacks
createdCallback()
When a new instance is created. Use like a constructor
attachedCallback()
When an element is added to the page
detachedCallback()
When an element is removed from the page
attributeChanged(attrName, oldVal, newVal)
When one of an element's attributes changes
There's moar!
Awesome Knowledges!
Web Components Resources
HTML5 Rocks
Polymer
X-Tags
Brick
CustomElements.io
Chromium Dashboard
Components Used in this Talk
Chart.js
Markdown
MailChimp
Google Analytics
Moment.js
Thanks!
Rob Dodson / @rob_dodson